Listen to this article:
Setting the stage
Have you ever found yourself desperately needing more GPU power to run your deep learning models, but your local configuration simply can’t carry out? If so, then this article will show you how to use cloud GPUs as if they were part of your personal machine.
The usage of GPU computational power in data science—especially in scenarios where someone is training and using deep learning models—is becoming increasingly appealing to our fellow data scientists and engineers. This comes as no surprise when comparing the average model training times on GPU versus CPU.
Lately, more and more technologies are emerging that aim to bring the GPU processing power into the data science world – mainly so data scientists can do their tasks more efficiently. One of these technologies is NVIDIA RAPIDS, a data science framework composed of multiple libraries with a common goal of executing end-to-end data science pipelines completely on the GPU.
However, most of us face the problem of not having laptops with a dedicated GPU, meaning that most personal computing devices don’t come with a graphical processing unit integrated in their system. That means you have to rent a virtual server on the cloud that has a GPU device connected to it. This solution has one major setback.—since we are working remotely, we are unable to use any of the most popular IDEs (code editors), with an exception for Jupyter Notebook which might be easy to set up on a virtual server.
However not everybody is happy with being limited to the Jupyter Notebook and not being able to use other code editors. We wanted to explore whether there is a way to overcome this. There is—and it’s pretty cool, given that it involves using the remote Python interpreter (the program executing the instructions written by the programmers) locally, which will allow us to use libraries in your local environment without having a GPU.
This article will present the steps necessary to set up an Amazon EC2 instance (which is just a fancy name for a virtual server) with a dedicated GPU, set up a Python environment with RAPIDS installed on it, and use the created interpreter locally in PyCharm. So let’s get started!
Setting up the EC2 Instance
Amazon Elastic Compute Cloud (EC2) provides scalable computing capacity in the AWS cloud. It allows the users to rent instances (virtual machines) in it. Different types of instances exist, and the ones that have a GPU included are:
- Amazon EC2 P3 Instances, with up to 8 NVIDIA Tesla V100 GPUs.
- Amazon EC2 G3 Instances, with up to 4 NVIDIA Tesla M60 GPUs.
- Amazon EC2 G4 Instances, with up to 4 NVIDIA T4 GPUs.
- Amazon EC2 P4 Instances, with up to 8 NVIDIA Tesla A100 GPUs.
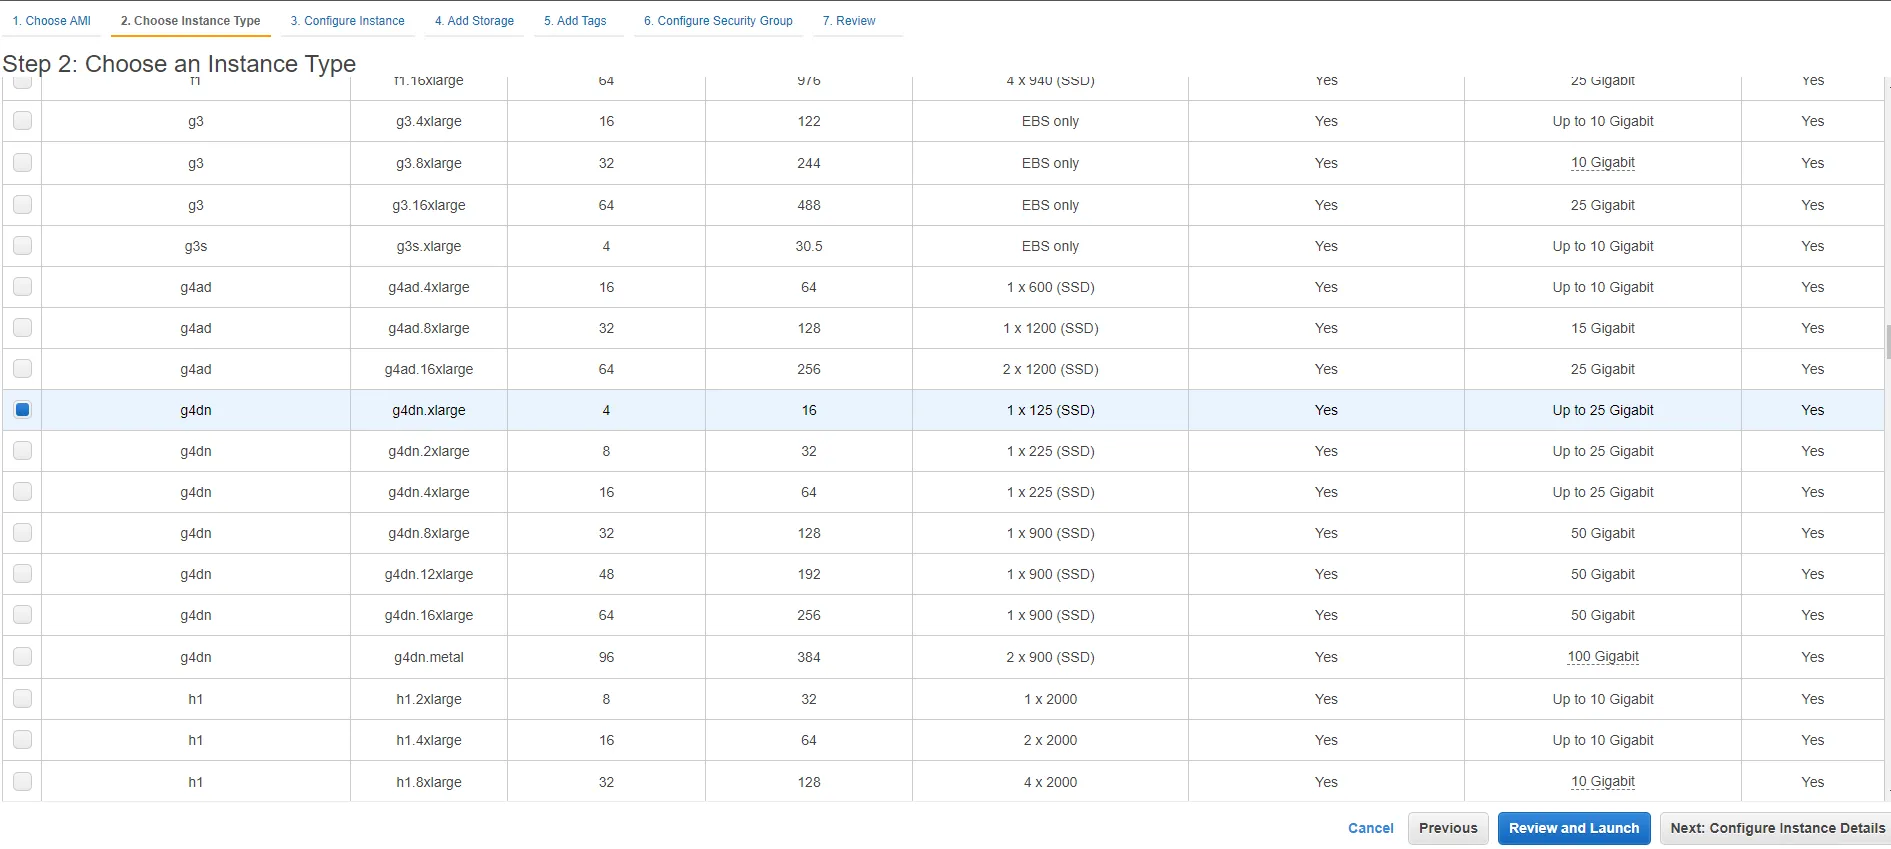
For our example, we will be using an g4dn.xlarge instance, which is a G4 type instance that comes with a single NVIDIA T4 GPU, 4 vCPUs and 16 Gib of RAM.
To start, just log into your AWS account, go to the EC2 console, select Instances on your left side menu, and click the orange launch instances button on the right.
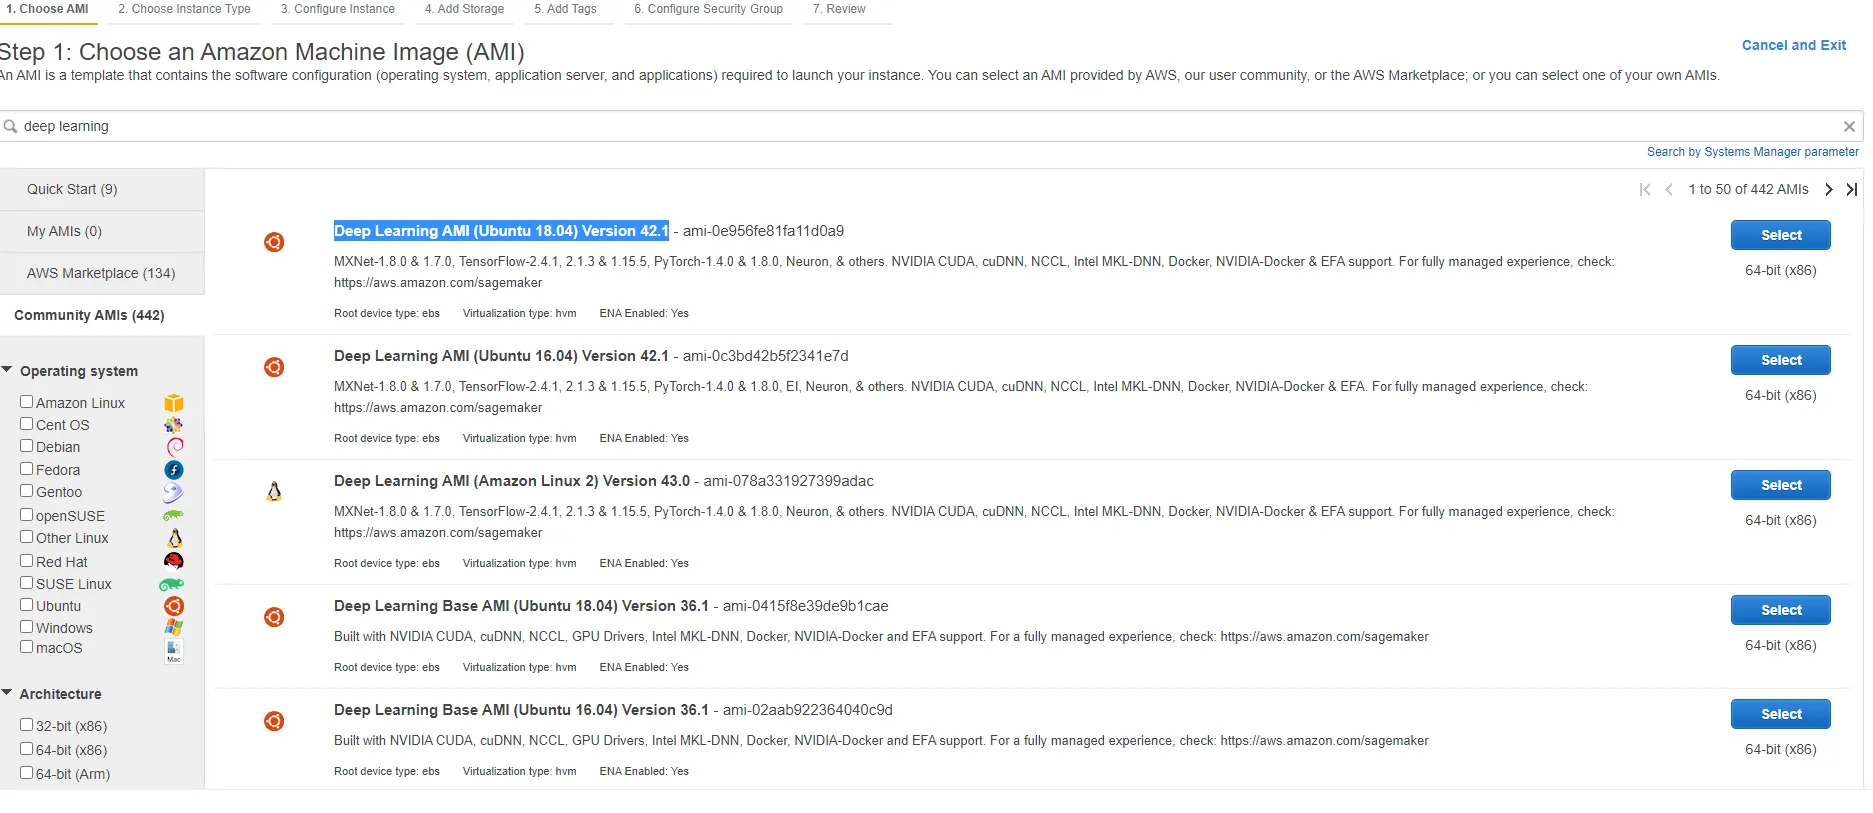
You will then be prompted to select an AMI (Amazon Machine Image) that will be used to configure your instance. There are some basic images that only include the operating system and others that are more complex. The latter include installing software packages on top of the operating system, which would be useful for more specific tasks like building web applications with a particular framework, a content management system like WordPress, or hosting a database server.
In our case we will be using the community Deep Learning AMI (Ubuntu 18.04) Version 42.1 since it comes with all the packages and drivers needed, such as TensorFlow, PyTorch, and support for CUDA. As the name suggests it is optimized to be used in Deep Learning projects.
Next, you should choose the instance type. Our recommendation is to use the g4dn.xlarge instance type since it’s the cheapest one you can use to configure RAPIDS in AWS.
After completing the remaining user specific details—which include defining a network, network interface for your instance, adding storage, configuring security groups, and defining a key pair that will be used to access your instance through SSH—you are ready to go. If you're operating in the healthcare sector, AWS offers a suite of security and operations services, including AWS CloudWatch, AWS Identity and Access Management and more that we recommend taking advantage of. Once you launch, you should see the instance running and have the ability to connect to it.
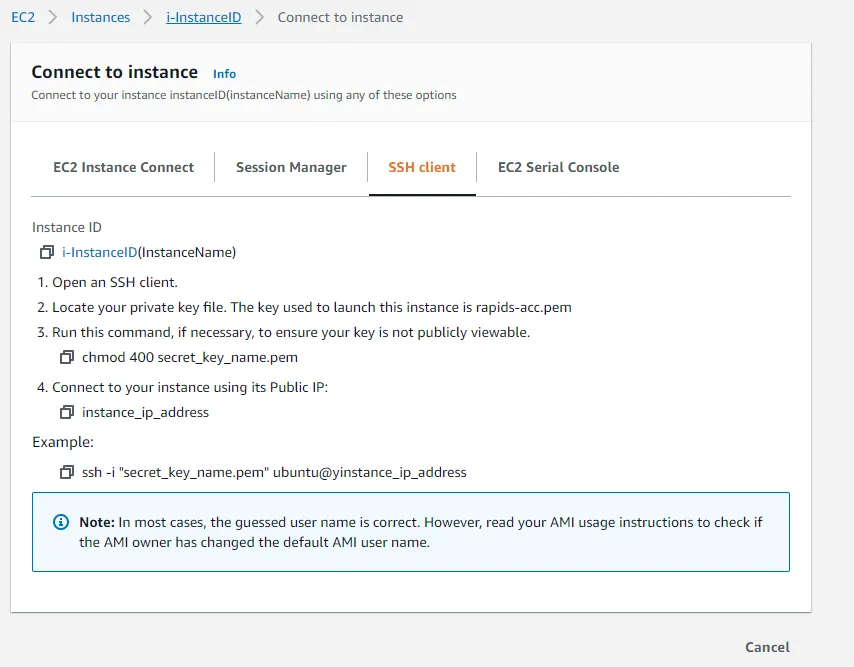
To do so, go to the instance summary by selecting it from the list of available instances and clicking on the ‘Connect’ button. You will find the instructions to connect to your instance under the SSH client. You can use Putty or Git bash as a SSH client for Windows.
If you accessed the machine successfully, then you are right on track and ready to install RAPIDS on your machine. If not, look back through the steps to make sure nothing was missed.
Installing RAPIDS
The AMI that we selected comes with the Conda package and environment management system preinstalled on it, so we can use it to create an environment with installed RAPIDS. To do so, just run the following command once connected to your virtual machine:

If you wish, you may also change some of the arguments as stated here. This will create a new conda environment called rapids-0.18 that has everything you need to run RAPIDS on it.
Setting PyCharm to use remote interpreter
The Professional version offers a compelling feature that allows you to configure a remote Python interpreter locally using SSH connection.
This next section provides a step-by-step guide to set the remote Python interpreter from the rapids-0.18 conda environment defined in our EC2 instance.
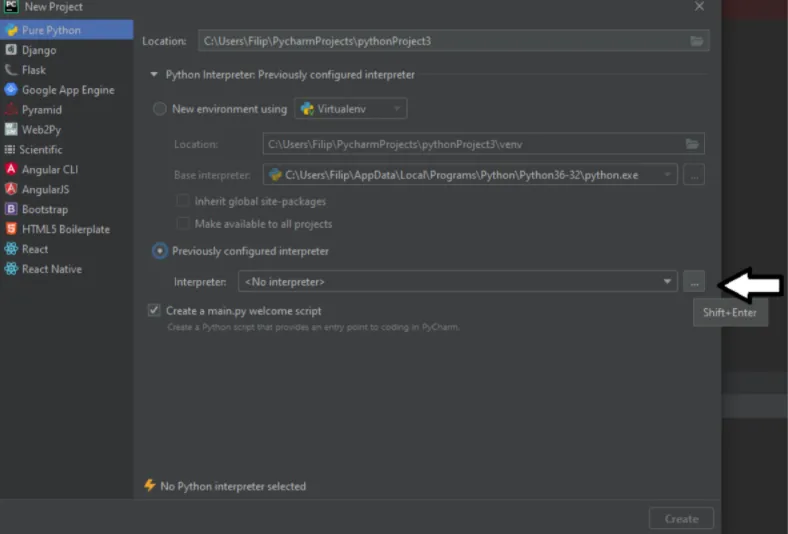
1. Start by creating a new Pure Python project. Check the radio button to use a previously configured interpreter then click the “...” button to add a new one (see visual).
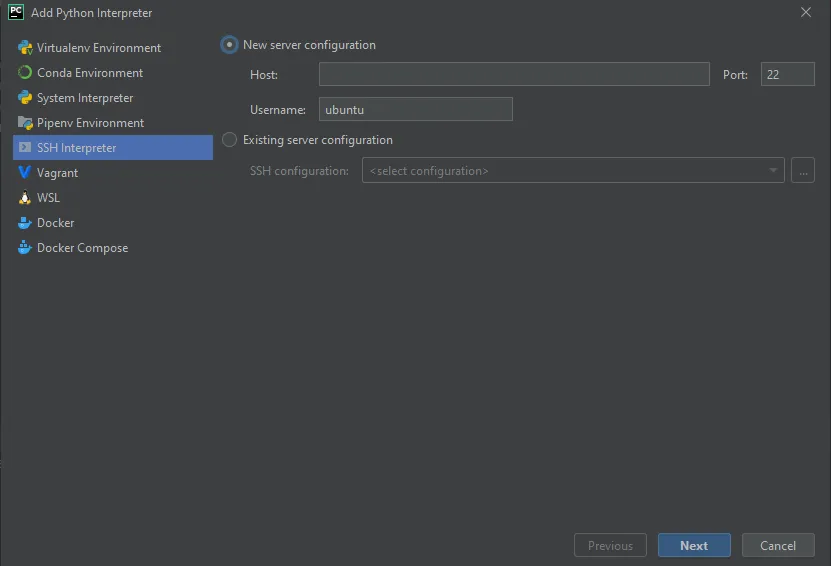
2. From the left menu, select SSH Interpreter. There you will be asked to enter all the information necessary so that PyCharm can establish a SSH connection with the remote interpreter. Enter the public IP address of the EC2 instance in the Host field, and ubuntu in the Username field. Click ‘Next’.
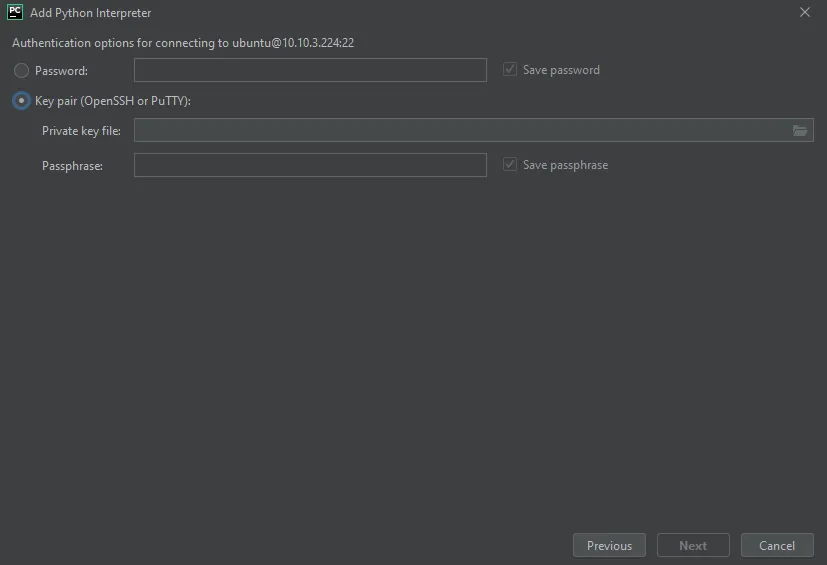
3. Configure the path to the secret key file on your local machine. Click ‘Next’.
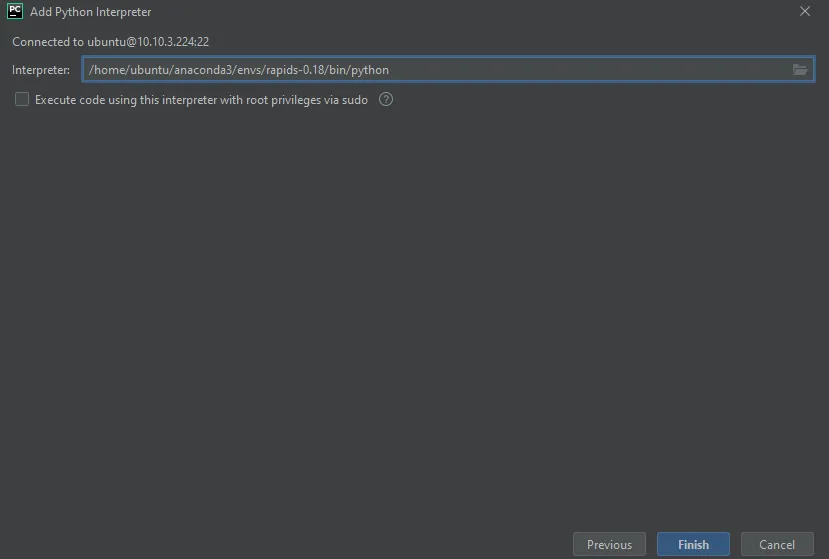
4. Once connected, you will be prompted to enter the file path to the desirable python interpreter. Insert this: /home/ubuntu/anaconda3/envs/rapids-0.18/bin/python. Note that rapids-0.18 refers to the name of the conda environment that we created in the previous steps. If you created an environment with a different name, use that instead. Click ‘Finish’ and you will be returned to the primary window.
5. Lastly, you have the option of setting the path to the folder where the project will be stored remotely on the virtual machine. If you want to specify the folder, you can do so in the field or you can just leave it to have the default value. Click ‘Create’ to finish your set up.
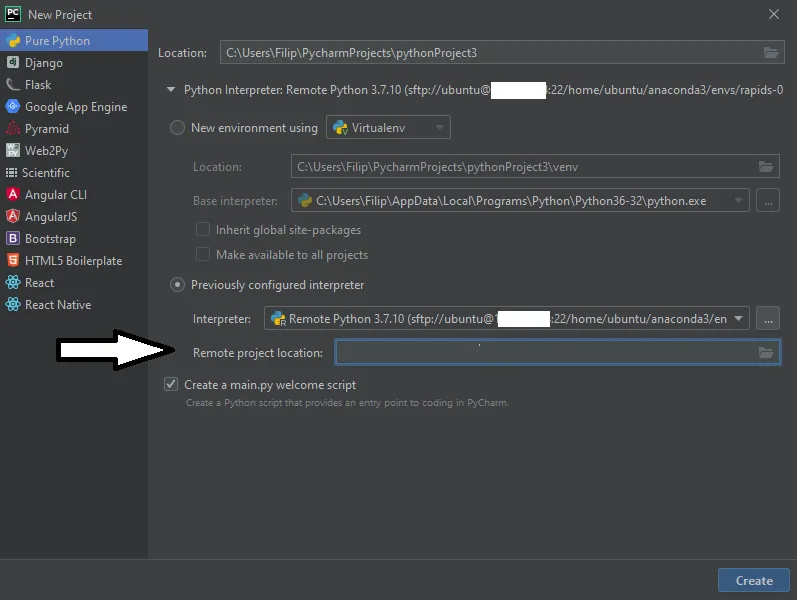
Congratulations! You have successfully created a project that will use a remote interpreter located in your EC2 instance.
Conclusion
This article illustrates the rather straightforward approach to setting up a GPU powered virtual server on AWS, and makes use of the GPU power locally in one of the most popular Python IDEs—PyCharm. It is a simple but useful and powerful solution for all the folks out there who want to make the most of the GPU power but don’t own the physical hardware needed. With this technique you get the feel of running the code locally, when in actuality the remote interpreter is running code remotely on the cloud.